1. Getting Started
You will first need to take a few things into consideration before moving forward:
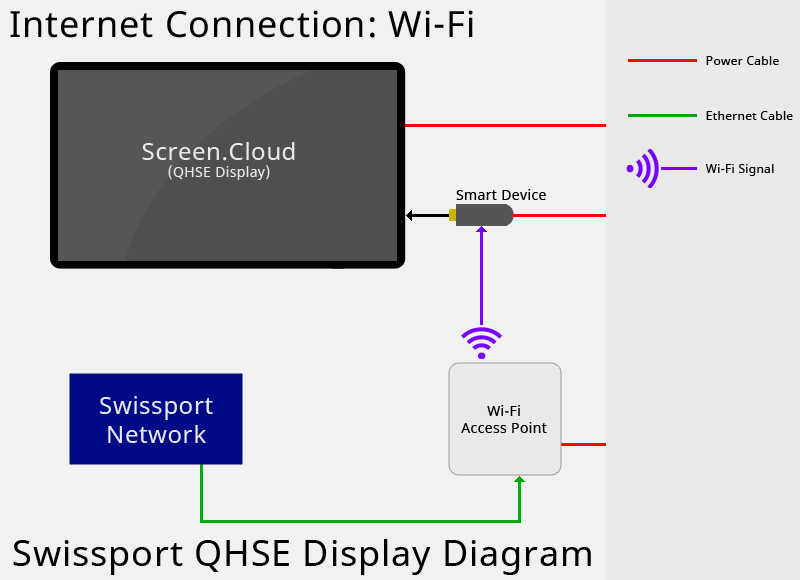
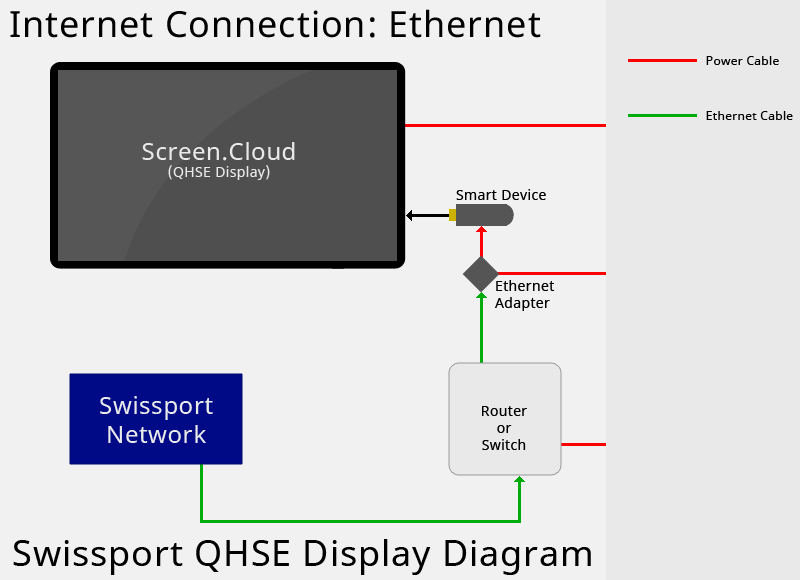
- What type of wireless internet access do you have at the location of the monitors?
- Is it Open Internet (not the Swissport Network)?
- Is it Closed behind the Swissport Network?
- If it is the latter, you will need to get with SP IT to order a Wi-Fi capable Access Point via the IT Equipment Order Form (accessible via SharePoint > Regions > USA > Scroll down a bit till you see "Self-Service Links" and choose "New IT Equipment Order Form")
- What "Smart Device" are you using to plug into the Display (TV)?
2. Smart Device Needed
2.1 Easiest Setup
- Amazon Fire Stick (best option)
- Connected via Wi-Fi
- Connected via Amazon Ethernet Adapter (best connection)
- Android OS Powered HDMI Stick (not to be confused with the Google Android TV hardware)
2.2 Stay Away From
- Any Google Chrome OS devices (e.g. Chromebit, Chromebooks, or Chromeboxes, due to the change in requirements to use Kiosk Mode (need paid Google Management account to run in Kiosk Mode)
- Chromecast or any other streaming only devices
- Raspberry Pi's as they are currently not supported by Screen Cloud
2.3 Still Unsure
To be safe, contact Swissport IT for the best option and they may be able to supply you (at a cost via IT Order Form) with the devices you need (usually an Android OS Powered HDMI Stick).
3. Amazon Fire Stick Setup
3.1 Create Needed Accounts
- Create a Gmail account (will need to remember Username and Password)
- Create an Amazon account using the Gmail account you just created (will need to remember Username and Password)
I don't recommend using your Swissport Email as you don't want to start receiving spam and junk emails.
3.2 Setup
- Insert device into the TV's HDMI input and plug in power to the Fire Stick
- Optional: Plug in Amazon Ethernet Adapter to Fire Stick, and power cable to Amazon Ethernet Adapter
- Proceed to plug in Ethernet Cable from Switch or Router to Amazon Ethernet Adapter
- After the Fire Stick fully boots, follow the steps to activate the device and proceed to setup Wi-Fi
- Optional: If using the Amazon Ethernet Adapter, skip above and continue below
- Add the Username and Password of your Amazon account you created earlier
- Go to the Amazon App Store
- Search and Download the "ScreenCloud Digital Signage Player" by ScreenCloud
- Icon should look like this:

- Follow the setup instruction for the ScreenCloud app
- You will need access to your local Screen.Cloud account provided by QHSE to complete "step b"
- More at: https://screen.cloud/learn/amazon-fire-tv-digital-signage
4. Android TV HDMI Stick Setup
- Don't confuse this with Googles Android TV Smart Devices. These are 3rd party HDMI sticks that run the Android OS
- Setup of these devices will be very similar if not the same as an Android OS Mobile Phone
- Create a throw away Gmail account (will need to remember Username and Password)
- Add the Username and Password of your Gmail account (from above)
- Go to the Google Play Store
- Search and Download the "ScreenCloud Digital Signage Player" by ScreenCloud
- Icon should look like this:
- Follow the setup instruction for the ScreenCloud app
- You will need access to your local Screen.Cloud account provided by QHSE to complete "step b"
- More at: https://screen.cloud/learn/amazon-fire-tv-digital-signage
5. Diagrams
Useful Tip:
Head on over to Screen.cloud for their setup information for:
Signage with Amazon Fire TV
Signage with Android TV HDMI Stick